Tomato season is approaching, and we are excited about it as usual! Making Passata at home is a very popular end of summer activity for an ever-growing number of people, not only from Mediterranean backgrounds. It is very easy and very quick, depending on the amount of tomatoes you are processing and the equipment you are using.
We have covered passata making extensively in our previous blog, as you can see at the link below.
If you have already made your passata or if you want something new in your pantry, why not trying peeled whole tomatoes? It is a very versatile way of storing this amazing fruit, ready to create new great recipes that involve the use of tomatoes. You can use them whole or they can be easily crushed by hand or processed in a tomato sauce machine at a later stage if needed.
“Pomodori pelati” , as they are called in Italian, are made by removing the skin off the fruit. You need to select ripe San Marzano tomatoes for the best result, but any plum variety will do just fine! As long as the quality is good!
When buying and using tomatoes, make sure to check the overall quality, avoiding damaged or too mature ones.
As in the passata making process, tomatoes need to be washed properly, in order to get rid of impurities and dirt that might affect the quality of your product. Immerse the tomatoes in a large and shallow food grade container, full of clean, fresh water. Make sure to put aside any damaged tomatoes, that can be used to “clean” your passata machine before the first use of the season. At this stage the tomatoes can be prepared by gently creating a small “cross” incision on the surface of the skin.
Prepare a large stock pot with abundant water on a burner and bring it to boil, then plunge your clean tomatoes for about a minute, a minute and a half. Just make sure to work in smaller batches that are easy to handle.
Remove the tomatoes with a practical strainer scoop and plunge them briefly in cold water and then on towels to cool a bit more before handling.
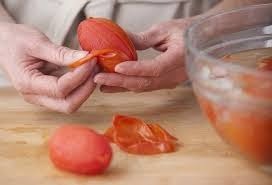
At this stage, you should see that, thanks to the incision previously made, flaps of skins are already started peeling off the flesh of the tomatoes. To completely remove the skins, use a knife (carefully!) or tweezers and pull those flaps gently until the whole surface is uncovered.
If more people are working with you, someone might start filling bottles and jars. (Make sure that everything is clean and sterilized, including the lids to close the containers). Most people add a pinch of salt and a basil leaf at the bottom of the jars, but it depends on taste. Some people add bay leaves, rosemary or other herbs and flavours. The best thing is to label the jars so you can never go wrong and pick the right jar for the right recipe!
Next, start placing the tomatoes in the jars, making sure to leave no air-bubbles between them by gently pressing them together. Keep adding tomatoes until the jars/bottles are nice and full but with a minimum space from the brim. Add another pinch of salt and any other herb before sealing.
Try eliminating any visible air-pocket by tapping gently on the side of the jars or adjusting the tomatoes with a clean and sterilized fork. (if you have made your batch of passata already, you can use some of that to fill any gap in between tomatoes!)
Close the jars/bottles with proper lids (better if new every season!), making sure not to over-tighten them, risking losing the grip and the seal of the lids themselves. Some people add a square piece of cellophane between the brim of the container and the lid, to create a better seal.
Once the jars are ready, you need to prepare a big stock pot for pasteurization laying towels inside it, similarly to what happens with passata making. Start putting all the jars inside the pot and put more towels in between, so they won’t touch each other and smash during this step. Fill the pot with water and light up the burner bringing the water to a gentle boil.
Let the jars boil for about 40 minutes, then turn the heat off and leave to cool down completely (some people leave everything to rest overnight!). When you are ready to remove all the jars, make sure to use thick kitchen gloves to protect yourself, in case any jar broke and there is shattered glass in the pot.
Store all your pelati jars in a cool, dry and dark place (as you do with your passata). They will last for up to three years, but they generally get eaten and enjoyed way before then!
If you make this recipe don’t forget to Capture and Share Your Artisan’s moments on Instagram With us .
Let us know what you think of it! We love getting in touch with our TAB family!


